Thursday, 12 April 2018

Different Type of wait in Selenium


During script execution, if elements in the webpage or webpage itself are not loaded or visible completely but selenium tries to perform some actions upon them, then it will throw “NoSuchElementException”, because selenium works on the element which are successfully loaded and visible.

To overcome this issues selenium provided three different type of wait command in selenium

1)  Implicit Wait
2)  Explicit Wait
3) Fluent Wait

Implicit Wait: -In selenium WebDriver, the idea of implicit wait has been influenced from waitr.Implicit wait can accept the time amount in seconds, milliseconds, nanoseconds, minute etc. It depends on your requirement.  

Implicit wait sets as default for selenium WebDriver. An exception will be thrown if it is not able to find out any element within the specific amount of time. This is applicable for each element in the application. 


When to Use Implicit Wait:  During implicit wait time, it tries to locate the element in the Webpage. If WebDriver does not find the element initially. Then it doesn’t try to identify the element again, instead it waits till the specified time is over. In the end moment when time is over, it checks once again if element is present before throwing the exception. The default setting is zero. It is default time which is applied throughout the execution session and only gets destroyed when the WebDriver instance is destroyed.

Explicit Wait: - This wait gives you the options to wait until a desired condition is satisfied. You can use some of prebuilt ExpectedConditions for the elements to be visible, invisible, clickable etc.


When to Use Explicit Wait: - It should be applied for those specific elements which takes more time to be displayed comparing to other elements in the application. Suppose, we have observed that one element is taking around 1 minute time to be displayed. Then we cannot apply implicit wait for 1 minute because then it will wait for same amount of time for every element. Instead, we will use explicit wait with the expected condition.
 Fluent Wait:- FluentWait contains 3 parameters.
WithTimeOut: defines the maximum amount of time it will wait for any element to be visible.
pollingEvery’ : takes time as an argument e.g. 5 seconds. It will check the status of element after every 5 seconds.
ignoring: we can define the type of exceptions need to be ignored during element search.


When to Use Fluent Wait:- Suppose, there are few elements which sometimes takes more than 1 minute to display or sometimes gets displayed within 2 seconds. For such elements, it would be better to use fluent wait. As it will keep checking the presence of those elements after a specified amount of time until it finds it or time out.
FluentWait can prove pretty handy for Ajax because of the flexibility you have for ignoring exceptions and easily tweaking the wait and polling times.

Friday, 23 March 2018

System Test life Cycle


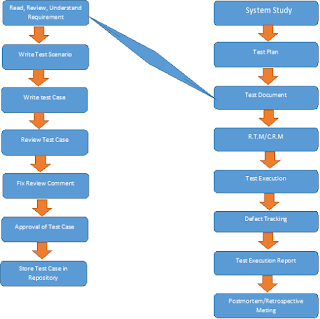
STLC is step by step procedure to test an application it flows following process :-

1) Once we get the requirement the leads and manager does one round of System Studies and prepared a document knows as Test Plan.
2) These plan consists off all the activities that need to be followed by test engineer for further activities or task.
3) Once the plan is ready we start writing the necessary test documents.


 a) To write test documents first we read, review and understand the requirements.
 b) Based on our understanding we prepared a high level document know as test scenarios.
 c) After the scenarios was prepared we started writing an in detail documents knows as test case.
 d) These test case send to the follow test engineer for review process.
 e) The reviewer put send us back with necessary review comments.
 f) As an author we used to fixed the required comments and send it back once again for review.
g) These process continued until both of us accepts for correctness of test case and finally lead used to approved test case which is stored in the test case repositories.

4) Before the execution we prepared one more documents know as R.T.M to make sure that every requirement is covered in the form of test cases.
5) By these time developer would have finish coding and the application is install on to the test server.
6) Then we start the test execution process where all the type of testing work implemented.
7) During testing any bug which are encounter was send to developer with the help of bug tracking tools. These defects tracking continue until all the bug where fixed and every test case is executed.
8) Finally we prepared a test execution report that defines the stability of product and the application was handed over to the customer.
9) In the end we had a Retrospect meeting where we discussed all the pros and cons regarding the current releases and any improvement can be done in the future releases.  

 These is all about the system test life cycle.

Wednesday, 14 March 2018

Static Binding and Dynamic Binding In Java


What Exactly Binding Is : -
Binding generally refers to a mapping of one thing to another, or in other words we can say connecting a method call to the method body is known as binding.

It can be clear with following diagram


In the above diagram “a1.methodTwo” called is binding corresponding methodTwo definition and “a1.methodOne” called is binding corresponding methodOne definition.

For every method call there should be proper method definition.

Different type of Binding:-
  1. static binding (also known as early binding).
  2. dynamic binding (also known as late binding).
1) Static Binding: - When type of object is determine at compile time (by the compiler), it is known as static binding. It is also called as early binding.


2. Dynamic Binding: - When type of object is determine at run time, it’s is known as Dynamic Binding. It is also called as late binding.


Few Important difference between static and dynamic binding :-

1.      Static binding in Java occurs during compile time while dynamic binding occurs during runtime.
2.      privatefinal and static methods and variables use static binding and are bonded by compiler while virtual methods are bonded during runtime based upon runtime object.
3.      Static binding uses Type (a class in Java) information for binding while dynamic binding uses object to resolve binding.
4.      Overloaded methods are bonded using static binding while overridden methods are bonded using dynamic binding at runtime.


Tuesday, 13 March 2018

Handle staleelementreferenceexception Selenium Webdriver


What is StaleElementReferenceException:-

This exception occurs, when Selenium navigates to a different page, come backs to the same old page and performs operations on the old page. Technically, it occurs when the element defined in the Selenium code is not found in the cache memory and the Selenium code is trying to locate it .When we define an element on a page using Selenium, Selenium stores it in a cache memory. The element stored in cache memory generally gets deleted when the driver navigates away to another page during Selenium code execution. On coming back to the same old page and then trying to identify the cache removed element on the old page, we get StaleElementReferenceException as a result.

Real time example with flow diagram


Common Causes:-

1. The element has been deleted entirely.
2. The element is no longer attached to the DOM.

Sample Program to understand the error:-


Solution: - To overcome Stale Element Reference Exception in Selenium

Solution 1:-

You can refresh the page and again try to for same element.
Example: - If you are trying to click on link and getting the exception then try in below format

Driver.navigate().refersh();
Driver.findElement(By.id(“ur element id”)).click();


Solution 2:-


Sometimes it takes the time to attach element on Dom so you can retry using for loop and try catch.

 try{
     Driver.findElement(By.id()).click();
    break;
}catch(Exception e){
System.out.println(e.getMessage());
}


Solution 3:-

Wait for the element till it gets available

wait.until(ExpectedConditions.presenceOfElementLocated(By.id("xpath")));


Use ExpectedConditions.refreshed to avoid StaleElementReferenceException and retrieve the element again. This method updates the element by redrawing it and we can access the referenced element.


Integration of Sikuli with Selenium WebDriver

Sikuli is an image-based open source tool to automate the GUI and can be used on any platform like Windows/Linux/Mac/Mobile. Sikuli uses a technique called image recognition to identify and control GUI components. At times when to access a GUI object, there is no access to its internal or external code; Sikuli comes in handy. It simply automates anything you see on the screen.


Need of Sikuli Integration with Selenium

Although as easy as it is to use Sikuli, there is one overhead since there is no built-in method to open a website/web-application in Sikuli. So if you’re executing a Sikuli script, you need to make sure that the website is already open in a browser.
To overcome this, Sikuli can be paired with Selenium WebDriver. Selenium offers a method to open a website in a browser. Using that method will help us prevent the effort wasted every time to open the website manually in the browser. Once the application is open, we can easily run Sikuli scripts on that website.

How it’s done:

1. Crop the image of the object which could not be identified by Selenium and put it into data pool folder.

2. Pass the path of that image into selenium script.

3. At the run time, Sikuli searches the image on the screen and matches it to the image in the data pool. If found then it performs the desirable action on that object.

Sikuli Setup for Selenium

1. In order to integrate Sikuli with Selenium, we need some jars such as sikuli-script.jar, selenium-server-standalone-3.10.0.jar, selenium-java-3.10.0.jar
 (or you can download any version of jars)

2. Create a java project in eclipse and add the listed external jars to your project using Build Path.


3. Create a java class inside the project, say Sikuli_Test.java.

4. To work on images using Selenium, create an object of Screen/Pattern classes.

Sample Program


In the above program, we tried to open the homepage of ‘google.com’ followed by creating objects for the screen and pattern classes. In the pattern class, we have passed the reference of any image on which we have to perform any operation(like click/double click/type, etc.) While executing this program, Selenium searches the image on the screen which we have passed as reference and performs the desired action on that if it exists

Nowadays Selenium is widely used tool for automating web-application. In real life, products are enterprise application, so we can expect application would be an integration of Silverlight, Java Applets, Raphael Java Script, Canvas Objects, Java Scripts, JQuery, etc. However, we cannot expect everything gets identified with Selenium and can face challenges in automating the few of the above mentioned UI with Selenium. So this time you get stuck, add a flavor of Sikuli in your script.